3.4
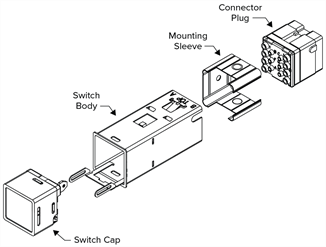
Proper installation is crucial to getting the full performance from your VIVISUN® switch or indicator. Proper installation falls into three major steps: 1) installing the body; 2) wiring/installing the connector plug; and 3) installing the illuminated cap.
If you are installing or replacing only the cap, it is not necessary to uninstall an existing switch body. Special tools are available (cap extraction tool, connector plug extraction tool, and crimped wire insertion/extraction tool) that should be used for correct switch installation.
Locate the proper installation guide
Appendix B has installation guides covering the following installations. Extended mount installations typically use the provided spacer to accommodate edge-lit panels.
| Installation Guides | |||
|---|---|---|---|
| Panel (*) | Enclosure | Appendix B | |
| Standard Square | |||
| Standard Mount | Extended Mount | ||
| Thin Panel | Unsealed | B-1 | B-2 |
| Sealed | B-3 | B-4 | |
| Thick Panel | Unsealed | B-5 | N/A |
| Sealed | B-6 | N/A | |
| Thin with Panel Adapter | Unsealed | B-7 | N/A |
| Sealed | B-8 | N/A | |
| Large Rectangular | |||
| Thin Panel | Unsealed | B-9 | B-10 |
| Sealed | B-11 | B-12 | |
| Thick Panel | Unsealed | B-13 | N/A |
| Sealed | B-14 | N/A | |
| (*) Thin panels are .032 - .187" thick. Thick panels are from .187 - .300" thick. | |||